Search This Blog

Tuesday, July 29, 2014

Sheer khurma

Introduction:

Hello friends. "Happy Eid" or Eid mubarak to all . Celebrating ramzaan without semiyaan sounds like a hole in the pot. Yesterday when I was on the way back from mumbai, I passed through a muslim locality and found people are madly shopping food delicacies for ramzaan right from fruits to vegetable to nuts to dairy to blahblah......And instantly i felt excited for ramzaan. And god's grace, I had a holiday for EID so thought to utilize it. The obvious choice was to make traditional "Sheer khurma", which is not a vermicelli payasam, what most of us think. It is much thicker, rich and creamy then normal vermicelli payasam and i made it today and it was super easy and too awesome.  So here comes another sweet recipe to relish.


Ingredients:

Milk: 1/2 litre (Full cream)
Condensed milk: 200 gms
Sugar: 2-3 tbsp
Vermicelli/Seviyaan: 50 gms (Fine)
Desi Ghee: 2 tbsp
Cardamon/Elaichi powder: 1 tbsp
Dates: 2-3 (chopped)
Grated/Chopped nuts, raisins: for garnishing

Serves: 3-4 persons
Preparation time: 10 mins
Cooking time: 20-25 mins

Method:

Pour the milk in a heavy bottom pan and put it on medium flame to boil. Stir in between to avoid seperation of cream and milk and sticking of milk at the bottom. When the milk comes to boil, reduce the flame and let the mil to reduce to about 3/4th.
At this stage, Add condensed milk and sugar to it. Mix and stir it and let it simmer for 5-7 mins on low flame till it becomes thick and creamy.
 
Meanwhile in another pan, add ghee and semiyaan and roast them till light brown. add the roasted vermicelli and elaichi powder & dates to the milk mixture and stir it for another 5-7 mins.
 
Put off the flame and let it come to room temperature. Garnish with it chopped nuts and raisins and serve. Enoy the sheer khurma with Eid greetings.
 
Note:
1. Use fine, thin vermicelli for making sheer kurma instead of thick vermicelli.Break those vermicellis into small pieces before roasting them.
 
2. The thickness of sheer khurma is more then that of normal kheer. so let the milk to get thickened.
3. If your khurma becomes too thick/solid during cooling, then add some more milk to it and bring it to desired consistency.
 

Wednesday, July 23, 2014

Chocolate Milk Shake

Introduction:-

“Chocolate”........As soon as I listen the name, my all senses are filled with delight. It is always hard to resist the pleasure of a sumptuous piece of chocolate and no doubt, it really requires smartness to deal with ingredient like chocolate for recipes. But personally, It’s one of my hot favourite ingredient and I love to make desserts out of chocolate. It’s always a must have product in my fridge. Chocolate milkshake is also the best use of all the gifted/leftover dairy milk chocolates (my childhood favourite) on B’day and parties.  Here I’m writing a very cool, super delicious and easy to make “Chocolate milkshake”, which is a favourite of my family and friends and even some of them can get up in sleep too, to satiate their taste buds with this creamy milkshake.

Ingredients:

Dark chocolate compound: 30 gms OR
Dairy Milk/ Plain readymade chocolate: 30 gms
Coco powder: 1 tsp
Full cream milk: 1 Glass
Sugar: 2 Tbsp
Vanilla Ice cream: 1 Scoop
Ice Cubes: 3-4

Serves:  1 person
Preparation time: 2 mins
Cooking time: 3-4 mins
 
Method:
Take all the chocolate in a sauce pan. Add 2 -3 Tbsp of milk to it and put it on stove to melt. Keep it stirring with a spoon and within 2 mins chocolate will melt and become soft and smooth to mix.

At this stage, add the melted chocolate to the milk. Mix sugar, cocoa powder, ice cubes and ice cream. With the help of hand blender, blend all the ingredients thoroughly to make smooth, creamy milkshake.

Taste and adjust the consistency and sugar as per your like.

Serve the chilled creamy chocolate milkshake with some melted chocolate sauce, whipped cream, scoop of vanilla ice cream or with choco chips on top.
 
Note:
     
    1. As soon as the chocolate melts, immediately add it to the milk and whisk it. Else the chocolate may solidify and becomes lumpy.
    2. Use plain dark chocolates instead of fruit & nut, almond bites or other flavoured chocolate for best milkshake.
    3. You can vary the quantity of chocolate and ice cream as per your calorie count.
    4. You can also add chocolate ice cream instead of plain vanilla ice cream.
    5. Adding ½ tsp instant coffee powder also makes wonderful milkshake.
    6. You can also add some fruits and relish amazing fruit smoothies like Choco banana shake


Monday, July 21, 2014

Rajasthani Pachmel Dal

 
Introduction:-
Pachmel dal is a regular version which is mostly cooked in Rajasthan. This dal is deliciously combined with Batis and forms an exquisite meal. The name ‘Pachmel’ is self explaining that this is a combination of five pulses cooked altogether. I specially made this dal for Batis but because of its nutritious value, I like to cook this dal almost every week and have it  with normal chapatis or rice. Because of the use of five pulses, it gives taste of each pulse in one recipe. It is very healthy, nutritious and a complete meal. I'm posting my quick and easy version to make this dal. So must read for all working girls...:)

Ingredients:

Yellow Moong dal: ¼ cup
Green Moong dal: 3 tbsp
Arhar dal: ¼ cup
Chana dal: ¼ cup
Urad dal (split washed): ¼ cup
Tomatoes: 3 medium
Onions: 1
Garlic: 6-7 cloves
Ginger garlic paste: 2 tsp
Green chilli: 2 tsp (chopped)
Kasoori methi: 1 tsp
Salt: as per taste or 2 tsp
Red chilli powder: 1.5 tsp
Turmeric powder: 1 tsp
Corriander powder: 1 tsp
Garam masala powder: 0.5 tsp
Asefoetida: ½ tsp
Mustard seeds: 1 tsp
Cumin seeds: 1 tsp
Whole red chilli: 2
Amchur powder: 1.5 tsp
Ghee: 2 tsp
Oil : 1 tsp
Green coriander: for garnishing (finely chopped)

Serves: 2-3 person

Preparation time: 15 mins

Cooking time: 15-20 mins

Method:

Wash all dals together and strain. Soak the dals in water for 15 mins. Meanwhile chop the tomatoes, onion and garlic finely. In a pressure cooker, add tomatoes, green chilli, ginger garlic paste and the strained and soaked dals. Add 3.5 to 4 cups of water. Add salt, turmeric powder, red chilli powder, coriander powder, kasoori methi and garam masala. Mix them with laddle and cover. Pressure cooks the dal on medium flame for 3-4 whistles.

Put off the flame and let the pressure release by itself.

In another pan, Heat oil and ghee. Add mustard seeds, asafoetida, cumin seeds, garlic and whole red chillies. Add chopped onions and sauté for 2-3 mins. Do not over cook the spice on high flame else they will get burnt.

Open the pressure cooker and check the dal. Mesh it with the back of laddle so that all the contents are mixed up. Add the hot tadka to the dal and mix it up. Add amchur powder. Finally garnish the dal with chopped coriander and serve hot with Batis.


Note:

  1. You may vary the number of pulses in case of unavailability or taste. Adjust the proportions accordingly.
  2. You may add double tadka to dal for more beautiful look. Like you sauté onion and garlic first and then add to the dal. Later you fry the rest of the tadka ingredients and pour in dal at time of serving.
  3. Curry leaves may also be added for more fragrant tadka.
  4. Take care while frying spices for tadka. Red chillies get cooked immediately. So put on low flame.
  5. Adding tomatoes and spice powder at the time of pressure cooking the dal makes dal more delicious and it looks exactly like hotel or restaurant. This I have learnt from my experience and I always make any dal by this method only. It saves cooking time also.
  6. You can adjust the consistency of dal as you like. Always add hot boiled water to the cooked dal to make it thin. This preserves the taste of dal.


Rajasthani Bati

Introduction:

It’s more then a year since I am away from my lovely blog. Actually I was busy with exploring the new city, new work, new hobbies and new people . So was not getting enough time to come back on my blog. Well now, as I’m well settled with my new workplace, The colours of the vibrant city has started leaving its tints on me & my personality & of course on  my food habits….Well Mumbai is always a ‘yeah’. Just loving it.

So As I’m back, I’m again in a full mood to revive my blog and bring back those tasty days to my this virtual home. So here comes the comeback recipe, the very popular, traditional, delicious Rajasthani Dal-Bati. Since I’m from jaipur, Dal-Bati is always a favourite food in my house and prepared on almost every special occasion but till now I have never tried my hands to prepare bati as my mother usually do that…but This time I gave it a second thought and tried my hands on and yipeeeeeeeeee. It came out absolutely yum and I felt the appetite for it again on the very next day…Well I almost ate my mom’s head on phone for getting the recipe and every bit of details..hahaha.. So Here comes the recipe and the special Dal recipe is given in my next post otherwise the post will be quite long.

Ingredients:

Wheat flour: 2 cups (sieved)


Milk: 1 cup
Milk cream (Malai): 1 tsp
Desi Ghee: 2 tsp + 1 cup (for dough + for dipping)
Salt: 2 tsp or as required
Carom seeds: 1 tsp
Water: for kneading (lukewarm)

Serves: 2 persons

Preparation time: 10-15 mins

Cooking time: 20-30 mins

 
Method:

For preparing the dough, Take wheat flour in a bowl. Add carom seeds, ghee, salt and malai to it. Mix the ingredients and rub the flour between your palms to smooth the contents.
 
Now add milk and start kneading the flour. Add some water and knead it. The dough should not be too tight or too runny. It should feel soft when pressed between palms. Rub some Desi Ghee on the kneaded dough and cover it and keep aside for 5-10 mins.

Meanwhile put the gas oven on flame. The oven should be kept hot while putting in the Bati to roast. So keep the flame on medium and heat the oven for 5 minutes.

Divide the dough into 5-6 equal sized balls. Make them in shape of ladoo and press slightly between your palms.

Place the balls in the heated gas oven keeping sufficient space among balls. And put the flame on low. Cover and let them cook for one side for 10 mins.

After 10 mins, flip the half roasted Batis and let them cook for another 10 mins from the other side.

After 10 mins, check the batis. They will be having light brown shade and some black spots randomly. If you feel the batis are not done yet, then you may cook them for some more time.

Heat 1 cup of ghee in a sauce pan. Dip the hot roasted batis in the Ghee and press them with help of a laddle. This ensures that the ghee enters inside the batis.

Serve the ghee coated Batis with the special Rajasthani Pachmel Dal, Kadhi, Gatte ki sabzi and Green Chilli pickle.


Note:

  1. If you are in a habit of extracting ghee from the milk cream, then the left over mawa of milk cream can be added to the dough instead of milk. I tried this and the Batis came out amazing.
  2. You may boil the batis first before roasting them to make ‘Bafla Bati’.
  3. You may even fry the Batis instead of roasting them but this will be more heavy as on diet part.
  4. Why not try different kind of stuffing inside the batis to make it more healthy and delicious like Veggie, paneer, soya nuggets etc.

Monday, April 9, 2012

Methi Ke paranthe

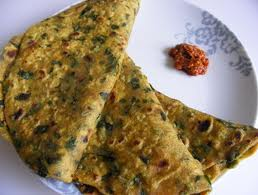
Introduction: How beautiful it is to start a morning with aroma of freshly cooked hot Methi ke paranthe. As the winters are over and summer stepped in, I'm still enjoying the some last moments catch of winter veggies. Let me tell you the recipe of delicious methi ke paranthe to once again feel the warmth of winter mornings.

Ingredients:
Green Fenugreek leaves(Methi): 250 gm
Onions: 2 medium sized(Optional)
Green chillies: 4
ginger: 1 inch piece
Carom seeds: 2 tsp
Wheat flour: 400 gm
Milk: 50 ml
Water: to knead the dough
Oil: for shallow frying the paranthas

Preparation time: 10-15 mins

Cooking time: 10 mins

Serves for: 7-8 paranthas

Method:
First clean the methi leaves. Remove all stems and take out methi leaves. Wash the methi and put them in boiling water for 5-7 mins. Drain the water and rinse cold water over boiled methi leaves. Let it cool . In a blender, Add methi leaves, green chillies and ginger and crush all the things together. Do no make a smooth paste. It looks great to see tints of methi leaves in the paranthas.
In a flat bowl, take wheat flour. Grate the onions in ithe flour. Add methi paste and salt to it. Add milk and mix all the things together and start kneading the dough. Use water as needed. Make a smooth dough out of it. Cover and let the dough rest for 10 mins.
Heat a griddle or tawa. Take out a lemon sized ball out of the dough. Roll it and apply oil on one surface . Again make a ball of it and roll it in the form of parantha. Roast the parantha on both sides with application of oil. Similarly make all the paranthas.
Serve hot paranthas with Curd, Pickle or green chutney.

TIPS:
  1. In a similar way you can make paranthas of any green leafy vegetables like spinach etc.
  2. you can also add chopped methi to the dough instead of a coarse paste.

Monday, April 2, 2012

RAWA MASALA IDLY

Introduction:
The masala idly is a healthy variation to the normal idly. I cooked the normal rawa idly with loads of fresh veggies and it turned out to be an more delicious, spicy and healthy version of regular rawa idly. It can be prepared quickly and ideal for breakfast and snacks.

Ingredients:

Curd/ Buttermilk: 1.5 cups (Preferably 1-2 days old)

Rawa/Semolina: 1.5 cups

Water: ½ cup

Eno fruit salt: 1 tsp

Salt: to taste

Turmeric powder: ¼ tsp (optional)

Oil: for greasing the idly moulds

Carrots: 1-2 medium sized (chopped thinly)

Green peas: ½ cup

Green chili: 1-2 (chopped finely)

Cabbage: ½ cup (finely shredded)

Spring onions: 1 (chopped finely)


Preparation time: 10-15 minutes

Cooking time: 20 minutes

Method:

Take curd in a bowl and whisk it with a whisker to make a fine paste. Add water and rawa into it and make a smooth paste. Add all the chopped vegetables into it and mix it. Add salt and turmeric powder to it. You can also add some red chilli powder, if you like spicy food.

Heat the steamer for making idlies. Just before, you are ready to make idlies. Add eno fruit salt to the mixture and mix it properly. Grease the idly moulds with oil. Pour 1-2 laddle full of mixture into each mould and place in the steamer. Cook the idlies on medium flame for 18-20 minutes.

After 20 minutes, Put off the flame and take out the idly moulds. Let it cool for 5 minutes. With help of knife, take out the cooked idlies from the moulds. Serve Hot Rawa masala idly with tomato chutney/ coconut chutney.

TIPS:

  1. You can add vegetables as per your choice.
  2. Cut the cooked masala idly in dhokla shaped pieces and tamper them with oil, mustard seeds and curry leaves. The tasty veg rawa dhokla is ready to eat.


Monday, March 26, 2012

Methiwali dal

Introduction: A healthy and unique preparation  of dal enriched with the nurishment of fresh green fenugreek leaves.

Ingredients:
Moong dal with skin: 1 cup
split pigeon pea: 1/4 cup
Fenugreek leaves(Methi): 100 gm
Onions: 2 medium sized(chopped)
Green chillies: 2 (chopped)
Tomatoes: 2 medium sized(chopped)
Ginger: 1/2 inch piece
Salt: to taste
turmeric powder: 1/4 tsp
red chilli powder: 1/2 tsp
corriander powder: 1/2 tsp
garam masala: 1/4 tsp
Lemon juice: 2tsp
cumin seeds: 1/2 tsp
Asefoetida: 1/4 tsp
Oil: 2 tsp
Ghee: 1 tsp
chopped corriander: for garnishing

Method:
wash and soak both dals together for 20-30 minutes. In a pressure cooker add the soaked dal with 2 cups of water, salt and turmeric powder. Pressure cook the dal for one whistle on medium flame. do no release the pressure. Let it go by itself. heat oil and ghee in a pan. Add cumin seeds and asefoetida to it. When it splutters, add chopped onion to it. Add green chillies and let it cook till the onions turned lilltle brown. Add wash and chopped methi to it and cook till the methi gets softened (4-5 mins). now add chopped tomatoes to it and cook till tomatoes get soft . Add rest of the spices to it and cook for 1 minutes.
now add the boiled dal to it. and cook the dal on low flame for 2 mins. put offt he flame. Add lemon juice to it and garnish with chopped corriander. serve hot with rotis.

Sunday, March 25, 2012

Lemon iced Tea

Introduction: A healthy, fresh and yummy drink to welcome the summer.

Ingredients:
Tea bags:2
Water: 4 cups
Mint leaves: 8-10
Ginger: 1 tsp (minced)
Honey: 4 Tbsp
Sugar: 1 cup(50 gm)
Lemon : 1
Ice cubes:4 per glass
For garnishing: lemon rings, mint leaves and ginger grates

Preparation time: 5 mins

Cooking time: 10 mins

Serves for: 4 persons

Method:
Boil 4 cups of water in a pot. Add ginger, mint leaves, tea bags to it. boil for 3-4 mins. Put off the flame. Add honey to the boiled water. In another pan, add 1 cup sugar with 3/4 cup of water and make  sugar syrup. when the tea water comes to room temperature, mix sugar syrup to it. strain the mixture and keep in fridge.
For serving, Add 4 ice cubes(or as per choice) to glass. Squueze out lemon juice to the glass. Pour the chilled tea into the glass. Decorate with mint leaves and lemon rings and ginger. Serve chilled.

Monday, February 13, 2012

Choco Lava cake

Introduction:
So tomorrow is valentine's day and everyone wants to make it the best day for sumone very special to them. I selected a very sweet and warm recipe for my heart and it's yummy molten choco lava cake. It contains all the softness and delicacy of a cake plus the mouth watering flavour of chocolate with a sweet warmth. a perfect dish expressing your feelings all the way on the plate in front of your valentine. Just dedicate this recipe for the love of your life, as I wish i could.

Ingredients:
¼ cup   Chocolate chips
¼ cup   Cherry filling
2 cups   Refined flour
1 tsp   Baking powder
¾ tbsp   Soda bi-carb(baking soda)
1 cup    curd
A few drops  Vanilla essence
1 cup   Milk
¾ cup   White butter
¾ cup   Caster sugar
6 tbsp   Cocoa powder

Preparation time: 30 minutes

Cooking time: 30 minutes


Method:
Preheat oven to 170*C. Grease a cake tin and line it with butter paper. Mix the chocolate chips with cherry filling and keep aside. Sift flour, baking powder, soda bicarb and cocoa powder together. Heat the milk till it is lukewarm. Whisk the curd, caster sugar, butter and vanilla essence together till smooth and frothy. Fold in the flour mixture alternating with milk. Mix quickly but gently to a smooth batter. Pour into well-greased muffin moulds and spoon chocolate chips & cherry filling mixture in the centre and bake on the centre rack for 8 minutes. Check the cake, remove cake from the oven and after a few seconds, demould it .you can also bake it in pressure cooker as described in my earlier post.
Serve the cake hot and share with your valentine in moon light. It will melt in your mouth and enjoy the emotions along with the cake....hehhehehe.

Veg Hakka Noodles

Introduction:
wowwww it's chinese............who doesn't fall for delicious chinese cuisine, be it chowmein, manchurian, fried rice, hakka noodles, momos, stir fry vegetables, spring rolls and the list goes on... Chinese food is the best option for anytime meal.. Be it lunch, dinner, evening snack or starter. chinese food is a complete package. and I am madly in love with chinese.....hehe I mean chinese food. Let's make the restaurant style Hakka noodles at home in just 10 minutes.

Ingredients:
Noodles: 1 pack(250 gm)
Cabbage: 125 gm (shredded)
Carrots: 2-3 (long and thinly sliced)
Capsicum: 2 medium sized(thinly sliced)
Onions : 2-3 (thinly sliced)
Spring onions green: 1/2 cup (chopped)
Sprouted beans: 1/2 cup (optional)
soya sauce: 2 tsp
white vinegar: 2 tsp
Black pepper: 1/2 tsp
Green chilli sauce: 2 tsp
Salt: to taste
Oil : 4 tsp
Preparation time: 10 minutes
Cooking time: 10 minutes

Serves for: 2 persons

Method:
Boil approx 1/2 liter water in a big bowl. Add the noddles to boiling water. Let them boil for 2 minutes. Remember not to perfectly cook the noodles. We require 3/4th done noodles. so after 2 minutes put off the flame and refresh the boiled noodles with cold water and dip the boiled noodles in cold water. 
Heat oil in a pan. Keep the flame high. Add onions to it and fry for a 5-10 seconds. Add cabbage and carrots to it and toss the vegetables and cook for 2 minutes on high flame. continue tossing the vegetables to avoid sticking of vegetable on the bottom of the pan. Now add capsicum to it and toss well. Now add boiled noodles, soya sauce, vinegar, green chilli sauce, salt and pepper, spring onion greens and sprouted beans to it. Toss all the things well. You can also add chilli flakes to it, if you like more spicy noodles.
Hakka noodles are ready to serve. Take the noodles out in a serving plate. Serve hot with tomato ketchup.

TIPS:
  1. Hakka noodles should be cooked on high heat. So cook on high flame.
  2. The noodles should not be fully cooked. Otherwise they will get mushy. Noodles should be half boiled.
  3. you can add or minus the vegetables according to your taste.
  4. you can also add the market made hakka noodles sauce to it.
  5. A lilltle ajinomoto can also be added to enhance the flavour.

Saturday, January 21, 2012

Potato and herb salad

Introduction:
This potato salad will give you the feel of international taste while sitting at your home dining table. It is made up of simple ingredients but tastes delicious. Try this salad as a variant for your dinner table.

Ingredients:
Baby potatotes: 8 (boiled and peeled)
Hung curd: 1 cup
Dry pudina powder: 1 tsp
Chopped green chillies: 2
Chopped coriander: ½ cup
Chopped mint leaves: ½ cup
Lemon juice: 1 tsp
Black pepper powder: ½ tsp
Mayonnise: 2 tsp
Salt: to taste
Oil: 1 tsp
White sesame seeds: 1 tsp

Method:
Peel the boiled potatoes and with help of a fork, poke all the potatoes. In a bowl, take hung curd. Add dry pudina powder, black pepper , salt and lemon juice to it and mix well. Add potatoes to it and mix well. Let it rest for 3-4 mins. Now mix chopped coriander, mint leaves and mayonnise to it and mix well. In a pan, heat oil. Add white sesame seeds to it. When they starts spluttering, add this dressing all over the salad. Serve immediately.


Tips:
This salad taste much good if the potatoes are a little warm. So try to make the salad with freshly boiled potatoes to retain the warmness.
You can add spring onions and any other herb of your choice to this salad.

Wednesday, January 11, 2012

Khoya Matar

Introduction:
This recipe is yet another addition to party dishes. It is excellent for main course and contains the sweetness of green peas with the richness of cashew and evaporated milk.
So try this tasty recipe in this winter season.

Ingredients:
Khoya/Mawa: 1 cup
Green peas (peeled and shelled): 3 cup
Tomatoes(Medium sized): 3-4
Green chillies: 2
Cashew nuts: ½ cup
Red chilli powder: 1 tsp
Turmeric powder: ¾ tsp
Corriander powder: 1 tsp
Fenel seeds powder (saunf): 1 tsp
Garam masala powder: ¾ tsp
Sugar: ¼ tsp
Bay leafs: 2 (optional)
Oil: 4-5 tsp
Salt: to taste
Chopped coriander: for garnishing
Coconut powder: for garnishing

Preparation time: 10 mins
Cooking time: 15 mins

Method:
Wash all the vegetables. Boil water in a pan and add tomatoes and green peas into it. Let them boil for 5 mins without covering. Strain the vegetables. Peel off the skin of the tomatoes and make a smooth paste of it with green chillies.
Heat oil in a pan and add bay leafs to it (if using). When they splutter, Add mawa to it and simmer the flame. Keep stirring and cook the mawa till it changes color and starts becoming granular. Now add all the dry spices to it and cook for 1-2 minutes. Add the peas and tomato paste to it. Give a nice stir to the mixture and cover it with lid. Let the mixture to cook on sim to medium flame for 5-8 mins. Adjust the seasoning and add half broken cashew nuts and sugar to it. Cook again till a thin layer of oil comes over the mixture(5-6 mins). Put off the flame.
Garnish it with chopped fresh coriander and coconut powder. Serve hot with chapatis or Paranthas.


Friday, November 18, 2011

Palak ke Pakode

Introduction: Pakoras and with hot Tea is an ultimate combination for any evening. especially in rainy and cold days. There are lots of varieties of pakoras . As this season, palak(spinach) is freshly availble, so let's make palak pakoda for this evening.

Ingredients:
Spinach: 200gm
Besan: 2 Cups
Onions: 1 medium sized
Green chillies: 2
Red chilli powder: 1/2 tsp
Corriander powder: 1/2 tsp
Kasoori methi: 1 tsp(optional)
Salt: to taste
Oil : for frying
Preparation time: 10 mins
Cooking time: 10 mins

Method:
Wash and cut the stem of spinach leaves. Keep the spinach aside for drying. Cut the onions in long thin slices. chop the green chillies. finely chop the spinach. Take besan in a bowl.Add all the dry spices. Add 1 cup of water and make a thick paste without any dumplings. Add chopped spinach, onions and green chillies to it and mix well. Heat oil in a pan. When oil is sufficiently heated, Take a laddle full of mixture and drop in the oil and fry it. Similary add more pakoras to oil for frying. Fre the pakoras from both sides till golden brown.Remove them on a kitchen towl to soak excess oil. Serve the hot pakoras with tomatoe ketchup and green chutney and ofcourse Hot tea.

Apple Jam

Introduction:
 "Apple" is an iron rich fruit and as said an apple a day keeps doctor away. But I don't like apples much. So I always try to find new ways to have apples. Apple jam is a very good recipe in this view. It's eay to make and delicious for your daily breakfast. So why to buy jam for market. Make it your at home.

Ingredients:
Apple: 2 (Medium sized)
Sugar: 1.5 cup
Water: 1 Cup
Elaichi powder: 1.5 tsp
Saffron or edible color: 4-5 strands or 2 drops
Lime juice: 1 tsp

Preparation time: 10 mins

Cooking time: 15 mins

Method:
Wash and peel apples. Grate the apples. Remove the seeds of the apples. Now heat a non stick pan. Add water and sugar to it and let it come to a boil. Then add apples to it and let it cook over medium flame . Stirr occasionaly to avoid sticking. After 5 mins, add saffron or color and elacihi powder. Cook the mixture till the apple softens and mixture starts drying. Add lim juice to it and cook for 5 more minutes. Put off the flame and let the jam cools. When the jam is cooled, fill it in a sterlized glass bottle and save in fridge. Enjoy the delicious jam daily over your breakfast table with toast, bread or paranthas.

Thursday, November 10, 2011

Coconut burfi

Introduction: "Coconut burfi" is a very easy to make sweets. The recipes made by cocnut are mostly popular in southern part of india but cocnut burfi is popular in all the parts of india. There are many ways of making cocnut burfi but i'm telling you the easiest way to cook it at home any time in a jiffy.

Ingredients:
Scraped dry coconut powder: 4 cup
Full cream milk: 3 cup
sugar: 2 cups
Desi Ghee: 1/2 cup
Green cardamon powder: 1/2 tsp
Grated dryfruits: for garnishing

Cooking time: 20 mins

Method: 
Take the grated cocnut in a pan. Add milk in it. cook the mixture on medium flame. when the milk starts to boil, add sugar and ghee in it. Let the mixture cook till it gets dry. Stirr occasionaly. Add green cardamon powder to it and mix well. When  the mixture will be cooked, it will be get almost dry and leave the surface of the pan. Place the mixture in a greesed plate and let it set. Decorate with the grated dryfruits and cut into desired shapes. Enjoy the delicious sweet burfi.

TIPS:
1. You can add colors and essence to give the burfi a differentt taste.
2. To grate the coconut, you can directly grind the dry cocnut. It will save a lot of time.
3. This burfi remains fresh for at least 15 days.

Sunday, October 16, 2011

Kadhai Paneer

Introduction:
"Kadhai paneer" is an ultimate combination of capsicum and cottage cheese. This curry is really good for those who avoid to eat a lot of gravy dishes. This is so easy to prepare and delicious for day to day servings. I'm telling you the recipe for kadhai paneer without onions and garlic but if you like, you can add onions and garlic to the dish.

Ingredients:
Green Capsicum: 250 gm
Cottage cheese: 150 gm
Tomatoes: 4-5 medium sized
Giner: 1 inch piece
Green chillies: 2 (finely chopped)
Curd:1/2 cup
Fresh cream/malai: 4 tsp
Cumin seeds: 2 tsp
Bay leaf-4
cloves-4
Black peppercorn: 4
Cinamon stick: 1/2 inch piece
Red chilli powder: 1 tsp
Turmeric powder: 1/2 tsp
Corriander powder: 2 tsp
Garam masala powder: 1/2 tsp
Black pepper powder: 1/4 tsp
Sugar: 1/2 tsp
Salt: to taste
Oil: 5 tsp
Green corriander: for garnishing
Fresh cream: for garnishing

Preparation time: 20 min
Cooking time: 15 min
Serves for : 4 Persons

Method:
Wash all the vegetables. Soak the paneer in water so that it will get soft. Cut the stem and Deseed the capsicum. cut the capsicum in suitable size square pieces. Finely chop the tomatoes. chop the green chillies. Peel and grate the ginger.
Heat oil in kadhai. Add cumin seeds, bay leaf, cloves, cinamon and black peppercorn to it. Fry till it starts spluttering. Now add chopped tomatoes, green chillies and ginger to the oil and let it cook till the tomatoes get mushy and leaves oil on surface. It will take approximately 3 minute on medium flame. Now add chopped capsicum to it and mix well. Add all the powdered spices and cover the kadhai with lid. let it cook for 5 minuts on slow flame. Open the lid and check that the capsicums are soft. Now add The beaten curd with malai to the kadhai and mix well.Cook for 2 minutes. The mixture will turn into a rich colorful gravy.
Take the paneer out of the water. Cut the paneer into square pieces and add to the gravy. Mix well. Cook for 3-4 minutes or till the paneer is perfectly mixed in gravy. Put off the flame.
Garnish the recipe with chopped green corriander and whipped fresh cream. Serve it with hot chapatis, paranthas and naan.

TIPS:
1. Sugar is added to cut the sourness of curd.
2. You can also make a smooth paste of tomatoes and grren chillies. But the chopped version of tomatoes make it more delicious.
3. Capsicums and paneer can also be deep fried before adding it to the recipes. This will make the curry more quickly, as we do not need to cook till the capsicums are soft but it will result in a more oily dish.
4. Onions and garlic can aslo be added. Add the chopped onions and garlic before adding tomatoes and cook them till it turns golden brown. Then follow the recipes as mentioned above.