Search This Blog

Showing posts with label Desserts. Show all posts

Tuesday, July 29, 2014

Sheer khurma

Introduction:

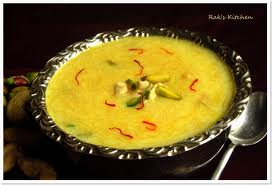
Hello friends. "Happy Eid" or Eid mubarak to all . Celebrating ramzaan without semiyaan sounds like a hole in the pot. Yesterday when I was on the way back from mumbai, I passed through a muslim locality and found people are madly shopping food delicacies for ramzaan right from fruits to vegetable to nuts to dairy to blahblah......And instantly i felt excited for ramzaan. And god's grace, I had a holiday for EID so thought to utilize it. The obvious choice was to make traditional "Sheer khurma", which is not a vermicelli payasam, what most of us think. It is much thicker, rich and creamy then normal vermicelli payasam and i made it today and it was super easy and too awesome.  So here comes another sweet recipe to relish.


Ingredients:

Milk: 1/2 litre (Full cream)
Condensed milk: 200 gms
Sugar: 2-3 tbsp
Vermicelli/Seviyaan: 50 gms (Fine)
Desi Ghee: 2 tbsp
Cardamon/Elaichi powder: 1 tbsp
Dates: 2-3 (chopped)
Grated/Chopped nuts, raisins: for garnishing

Serves: 3-4 persons
Preparation time: 10 mins
Cooking time: 20-25 mins

Method:

Pour the milk in a heavy bottom pan and put it on medium flame to boil. Stir in between to avoid seperation of cream and milk and sticking of milk at the bottom. When the milk comes to boil, reduce the flame and let the mil to reduce to about 3/4th.
At this stage, Add condensed milk and sugar to it. Mix and stir it and let it simmer for 5-7 mins on low flame till it becomes thick and creamy.
 
Meanwhile in another pan, add ghee and semiyaan and roast them till light brown. add the roasted vermicelli and elaichi powder & dates to the milk mixture and stir it for another 5-7 mins.
 
Put off the flame and let it come to room temperature. Garnish with it chopped nuts and raisins and serve. Enoy the sheer khurma with Eid greetings.
 
Note:
1. Use fine, thin vermicelli for making sheer kurma instead of thick vermicelli.Break those vermicellis into small pieces before roasting them.
 
2. The thickness of sheer khurma is more then that of normal kheer. so let the milk to get thickened.
3. If your khurma becomes too thick/solid during cooling, then add some more milk to it and bring it to desired consistency.
 

Monday, February 13, 2012

Choco Lava cake

Introduction:
So tomorrow is valentine's day and everyone wants to make it the best day for sumone very special to them. I selected a very sweet and warm recipe for my heart and it's yummy molten choco lava cake. It contains all the softness and delicacy of a cake plus the mouth watering flavour of chocolate with a sweet warmth. a perfect dish expressing your feelings all the way on the plate in front of your valentine. Just dedicate this recipe for the love of your life, as I wish i could.

Ingredients:
¼ cup   Chocolate chips
¼ cup   Cherry filling
2 cups   Refined flour
1 tsp   Baking powder
¾ tbsp   Soda bi-carb(baking soda)
1 cup    curd
A few drops  Vanilla essence
1 cup   Milk
¾ cup   White butter
¾ cup   Caster sugar
6 tbsp   Cocoa powder

Preparation time: 30 minutes

Cooking time: 30 minutes


Method:
Preheat oven to 170*C. Grease a cake tin and line it with butter paper. Mix the chocolate chips with cherry filling and keep aside. Sift flour, baking powder, soda bicarb and cocoa powder together. Heat the milk till it is lukewarm. Whisk the curd, caster sugar, butter and vanilla essence together till smooth and frothy. Fold in the flour mixture alternating with milk. Mix quickly but gently to a smooth batter. Pour into well-greased muffin moulds and spoon chocolate chips & cherry filling mixture in the centre and bake on the centre rack for 8 minutes. Check the cake, remove cake from the oven and after a few seconds, demould it .you can also bake it in pressure cooker as described in my earlier post.
Serve the cake hot and share with your valentine in moon light. It will melt in your mouth and enjoy the emotions along with the cake....hehhehehe.

Thursday, November 10, 2011

Coconut burfi

Introduction: "Coconut burfi" is a very easy to make sweets. The recipes made by cocnut are mostly popular in southern part of india but cocnut burfi is popular in all the parts of india. There are many ways of making cocnut burfi but i'm telling you the easiest way to cook it at home any time in a jiffy.

Ingredients:
Scraped dry coconut powder: 4 cup
Full cream milk: 3 cup
sugar: 2 cups
Desi Ghee: 1/2 cup
Green cardamon powder: 1/2 tsp
Grated dryfruits: for garnishing

Cooking time: 20 mins

Method: 
Take the grated cocnut in a pan. Add milk in it. cook the mixture on medium flame. when the milk starts to boil, add sugar and ghee in it. Let the mixture cook till it gets dry. Stirr occasionaly. Add green cardamon powder to it and mix well. When  the mixture will be cooked, it will be get almost dry and leave the surface of the pan. Place the mixture in a greesed plate and let it set. Decorate with the grated dryfruits and cut into desired shapes. Enjoy the delicious sweet burfi.

TIPS:
1. You can add colors and essence to give the burfi a differentt taste.
2. To grate the coconut, you can directly grind the dry cocnut. It will save a lot of time.
3. This burfi remains fresh for at least 15 days.

Thursday, August 11, 2011

NaanKhatai

Introduction:
"Naan khatai" is basically an indian cookie. It adds to another recipe in baking category. This indian cookies is ultimate snack. You make it and store it upto 2 months. It makes a good combination when served with tea. I just tried it today and it was so easy to make. I made this in pressure cooker but you can try it in your Oven too.

Ingredients:
Refined flour(Maida): 2.5 cup
Gram flour(Besan):1/2 cup
Semolina(suji): 1 tsp
Baking powder: 1 tsp
Sugar: 2 cups(powdered)
Ghee: 1 cup
Green cardamon powder: 2 tsp
Milk: 4 tsp

Preparation time: 15 min
Cooking time: 10-15 min

Method:
Take melted ghee and sugar in a bowl and whisk it till a smooth paste is formed. Sieve maida, besan, suji and baking powder together. Add green cardamon powder to it and mix well. Add this mixture to the ghee mixture and mix it properly. A doughy mix will be formed. Add milk to it and make a soft dough out of it. The dough won't be like the dugh of chapatis but it will like the dough we have for laddoos.Cover it and keep aside for 2-3 hours.
Take small balls out of the dough and make a smooth ball with your palms. Press it slightly to give it a flat shpae.Try not to brake them from the ends. It's usual to have some cracks in it. Heat the oven to 180 degree centrigrade. Take a lightly greesed plate. Place the naankhatai in it leaving sufficient space between two. Place then in oven and bake for 10 mins. Check after 10 mins. It will be slightly brown. Bake for another 5 mins and take out of the oven. Let them cool completely.
If you are using pressure cooker, then bake them for 10 mins over the low flame. It will be ready.
When the Naankhatai is cool, you can store them in an air tight container or serve them right away.You can decorate them with Almonds or chopped dryfruits.

TIPS:
1.When you will take out those cookies from oven or cooker, you will find that these are soft but when they will get cooled, It will automatically turn out to be crisp and hard as biscuits. So don't overcook them to make hard.
2. Greese the tin with ghee.
3. Leave sufficient space between the two naankhatai. It expands during cooking.
4.It's usual to have some cracks in the cookie after baking.

Monday, July 25, 2011

Vermicelli Payasam(Seviyan kheer)

Introduction:
I had been to chennai for almost one year during my official training. "Payasam" is the most popular dessert of south indian cuisine. I used to have payasam on every special occasion during my stay. It is basically a sweet preparation with milk and vermicelli or rice. We generally call it "Kheer" in north india. There are wide variety of payasam in southern cuisine. I'm telling you a very simple payasam which can be cooked in just 10 mins with very less ingredients. I'm sure you'll like it.

Ingredients:
Milk: 5 cups
Vermicelli(seviyaan): 1 cup
Desi Ghee: 2 tsp
Cashewnuts: 7-8(broken into half)
Sugar: 3/4 cup
Green cardamon powder: 1/2 tsp
Nutmeg(jaiphal) powder: 1/4 tsp
Saffron: a pinch
Grated mix dryfuits: for garnishing

Preparation time: 5 mins
Cooking time: 10 mins
Serves for: 2 persons

Method:
Take milk in a heavy bottomed pan and let it boil. Meanwhile, heat ghee in a pan. Add vermicelli and cashewnut into it. Roast it on low flame till it turns dark brown. A sweet aroma will come when it'll be roasted. Add the boiling milk to the roasted seviyaan. Keep stirring continuously on low flame for 5 mins. Now add sugar and saffron into it. Cook for another 2-3 mins on low flame. Check the consistency of the mixture. Add green cardamon powder and nutmeg powder into it. Cook for a minute.Stirr well. Garnish it with grated dryfruits. Serve hot or cold.

TIPS:
1. Don't cook it for long. because as the payasam gets  cooled, it gets a little more thick.
2. If you don't have saffron, then add some liquid yellow color to it or have it without saffron or color.

Friday, July 22, 2011

Pineapple cake(Cooker method)

Introduction:
Today i'm going to share with you another recipe in the series of cakes. This is 'pineapple cake', a yummy delicacy.If you know how to make a basic sponge cake then any kind of cake will be an easy task for you. In this also, rest of the ingredients will be same as my previous posts. Only I'll be using some pineapples and it's essence to give it the pineapple flavour.I'll tell you about the icing on cake in my subsequent posts.
 
Ingredients:
Refined flour(maida): 2 cups
Powdered sugar: 2 cups
Vanilla essence: 5-6 drops
Egg: 3
Unsalted butter: 150 gm
Baking powder: 2 tsp
Canned Pineapple slice: 3
Pineapple essence: 1 tsp
Pineapple juice: 2 tsp
Milk: 11/4 cup
Chopped tuity fruity: 4 tsp
Liquid yellow color: 2 drops
Preparation time: 40 mins

Cooking time30 mins


Method:
Sieve the flour with baking powder 5 times. Seperate egg yolk and white. Beat them seperately till it becomes fluffy. Mix butter and powdered sugar and beat them thoroughly.Now mix egg white first into the butter mixture and add vanilla essence and beat again. Then mix the egg yolk and beat again till the mixture becomes soft. Now add the flour in the mixture while beating continuously. Add crushed pineapple, pineapple essence, tuity fruity, pineapple juice, yellow color and milk into it.Keep beating in the same direction for 8-20 minutes.
Greas the cake tin with butter. Place the cooker on high flame and spread two cups of salt into it.
The idea of using salt is to avoid a direct contact of the cake tin with the flame. Take sufficient amount of salt so that it'll cover the cooker's bottom properly. cover the lid upside down and heat the cooker on high flame for 2 minutes.

Now sim the flame to the lowest. Place the cake mixture into the cake tin and place the tin into the cooker. Cover it with lid and remove the whistle. Cook for 30 minutes on lowest flame.

Open the cooker after 30 minutes. Do the knife test to check whether the cake has been cooked. Take out the cake tin and turn it upside down on a serving plate. The cake will come out. Let it get cooled in the fridge and decorate it with your favourite icing and serve.

TIPS:
1. Whenver you beat the batter, beat it in one direction only.
2. You can also use coarse sand instead of salt for baking the cake but using salt is a more easy option.
3. Do not keep the pineapple outside in open air for long time. Use it immediately otherwise it will turn slightly bitter in taste.
4. You can use fresh pineapple instead of canned pineapple. But caremalise the fresh pineapples before adding into the recipe.
5. You can mix some dryfruits also in the recipe as per your taste.
6. Pineapple juice can be avoided, if you don't have it.

Tuesday, July 19, 2011

Pineapple Halwa

Introduction:
Pineapple itself is a delicious fruit. Pineapple Halwa is a pleasant tasting dish. It serves well to all festivals and give a rich look over usual suji halwa preparation. I made it mostly whenever i have to prepare "prasad" for pooja. But it goes well with any formal dinner. Try it out.

Ingredients:
Pineapple: 1 cup(peeled and chopped finely)
Semolina(suji):1 cup
Ghee: 1 cup
Sugar: 1 cup
Water: 2 cups
Almonds: 5-6(broken into half)
Cashewnuts: 5-6(broken into half)
Saffron: a pinch
Green cardamon powder: 1 tsp
Pineapple essence: 5-6 drops
Pineapple juice: 2 tsp

Preparation time: 10 mins
Cooking time: 15 mins
Serve for: 2 persons
Method:
Heat ghee in a pan. Add semolina into it and cook stirring it continuosly till it turns golden brown on low flame. Add saffron and pineapple pieces into it.Further cook for 2-3 minutes. Now add pineapple juice and water into it. Cover it and let it cook for 2-3 minutes. Add sugar and green cardamon powder and pineapple essence along with dry fruits.Keep stirring till all the moisture is removed and semolina is cooked. when the halwa will be prepared you will find that it will start sticking to the surface of the pan. Garnish the halwa with grated dryfruits and serve hot.
TIPS:
1. You can avoid pineapple juice if you don't have it.
2. Canned pineapples do well int his recipe.
3. Taste the pineapple before adding it into the recipe. It should not be tangy in taste. If it is then add all the pineapple pieces in sugar syrup and caremalise it before adding it into halwa.

Tuesday, July 12, 2011

Badam ka Halwa(Almond sheera)

Introduction:
Almonds are a very rich source of protein.Consumption of almond lowers the cholestrol level, reduces the risk of lifestyle disease and gives overall wellness. Badam ka halwa is an utterly delicious and rich indian sweet dish that will be loved by everyone. It is really a mouthwatering dish to welcome your love ones at your home on every occassion.

Ingredients:
Almonds: 1 cup
Full cream milk: 1 cup
Ghee: 1 cup
Sugar: 1 cup
Water: 1/2 cup
Green cardamon powder: 1 tsp
Saffron:for decoration
Grated mix dryfruits: for decoration

Preparation time: 10 mins
Cooking time : 35 mins
Serves for : 2 persons

Method:
Soak the almond in warm water for at least 4 hours. Peel off the skin of almonds and drain the water. Make a smooth paste of almonds with milk in grinder.
Heat a heavy bottomed pan or kadai. Add ghee to it. Add the almond paste to it and continue to stirr it on low flame. At first, the mixture will stick to the pan but keep stirring it. You should stirr it continuously otherwise the halwa may get burnt.
When the mixture will be perfectly cooked, all the ghee will come on the surface and it won't be sticky. It will turn into a nice brown shade. It will take approximatel 20 mins to get it cooked on low flame.
Meanwhile, Heat the water into another pan and add sugar into it. cook it for 5 mins till the whole sugar gets dissolved. Now mix the sugar syrup into halwa and cook for another 5 mins. Mix the green cardamon powder into it and cook for 2 mins.
Halwa is ready to serve. Decorate it with saffron and grated, chopped dryfruits.

TIPS:
1. Make sure the halwa is cooked properly. You will come to know by seeing that all the ghee will come on the surface and halwa won't remain sticky to the pan. You will be able to stirr it very smoothly.
2. If you don't have much time then add hot boiling water over the almonds and soak in just a minute or so. Then put in into a strainer and run cold water over it.Now take one almond in your hand and press it from the other end. you will see that the skin will come out easily. this is a quick way to blanch the almonds.
3. Don't add sugar directly to any kind of halwa. It's better to add sugar syrup to halwa.
4. Cook the halwa on low flame for proper cooking.
5. I'll suggest to use  a non stick pan for beginners.


Friday, July 1, 2011

Chocolate cake

Introduction:
Chocolate cake is supposed to be the most delicious dessert. It's most popular in children but now a days elder persons also enjoy it a lot. So let's make chocolate cake at home today and satiate the taste buds with the sweet aroma of chocolate.


Ingredients:                                                                              
Refined flour(maida): 2.5 cups
Powdered sugar: 2.5 cups
Baking powder: 2.5 tsp
Coco powder: 5 tsp
Butter: 180 gm
Fresh eggs: 4
Vanilla essence: 6-7 drops
Dark chocolate: 30 gm

Preparation time: 1 hr
Cooking time: 32 mins

Method:
First of all take the flour, baking powder and coco powder together and sieve it 5 times. Keep it aside. Sieve the powdered sugar. Let the butter to melt at room temperature. When it is soft, mix the butter in sugar and beat thoroughly to have a fine mix. Now break the eggs and separate the yolk and white. Beat the yolk and white separately till the mixture becomes frothy.
Now mix the egg white into butter and sugar mixture. Beat again in one direction. When you get a smooth paste, add egg yolk. Beat again.
Double boil the dark chocolate. It means place a bowl of water on flame. Allow it to boil. Now put the chocolate in another small bowl and place the bowl into the boiling water bowl and let the chocolate melt.
Now slowly slowly mix the flour mixture into the egg mixture. Continue beating to avoid lumps. Add small small quantity at single time. Continue beating the mix.Add the melted dark chocolate and vanilla essence and beat for 10  mins in one direction.
Grease the cake tin with butter.Preheat the cooker or oven. Place the mixture into the tin and then allow it to bake for 32 mins in cooker on low flame.
Put off the flame after the time. Check the cake with knife. If it is done, allow it to get cooled. turn the cake tin upside down for the cake to come out. Sprinkle powdered sugar with help of a filter evenly on the cake surface or decorate it with icing cream.
Delicious chocolate cake is ready.

TIPS:
1. The cake can be cooked in pressure cooker with the help of the method described in earlier post.
2. You can add different kind of nuts in the batter to make a tasty chocolate nuts cake.
3. If you don't get dark chocolate at the store, use bournville or similar kind of dark chocolate. Avoid using dairy milk or similar kind of sweet chocolate into the cake.
4.Measurements matter a lot while preparing the cake. So follow the recipe strictly.
5. If you are abking the cake in oven, preheat the oven at 180 degree C for 10 mins and then bake the cake for 30 mins at 160 degree C.
6. There are so many ideas for decorating the cake. Use differnt kind of icing and fruits to decorate it.

Wednesday, June 1, 2011

Vanilla sponge cake in pressure cooker

Introduction:
Hi all. after I came back from office today, I was having a great desire to eat cake. I was missing my home because i don't have an oven to bake the cake but then i thought to make it in the cooker  and TADA.....it worked and it ws the best cake i've ever made...I'm going to share this recipe wiith you all.

Ingredients:
Refined flour(maida): 2 cups
Powdered sugar: 2 cups
Vanilla essence: 5-6 drops
Egg: 3
Unsalted butter: 150 gm
Dryfruits(mixed chopped): 1/2 cup
Salt: 1/2 tsp
Baking powder: 2 tsp

Preparation time: 45 mins
Cooking time: 40 mins

Method:
Sieve the flour with baking powder and salt 5 times. Seperate egg yolk and white. Beat them seperately till it becomes fluffy. Mix butter and powdered sugar and beat them thoroughly.Now mix egg white first into the butter mixture and add vanilla essence and beat again. Then mix the egg yolk and beat again till the mixture becomes soft. Now add the flour in the mixture while beating continuously. Keep beating in the same direction for 8-20 minutes.
Greas the cake tin with butter. Place the cooker on high flame and spread two cups of salt into it.
The idea of using salt is to avoid a direct contact of the cake tin with the flame. Take sufficient amount of salt so that it'll cover the cooker's bottom properly. cover the lid upside down and heat he cooker on high flame for 2 minutes.

Now sim the flame to the lowest. Place the cake mixture into the cake tin and place the tin into the cooker. Cover it with lid and remove the whistle. Cook for 35 minutes on lowest flame.

Open the cooker after 35 minutes. Do the knife test to check whether the cake has been cooked. Take out the cake tin and turn it upside down on a serving plate. The cake will come out. Let it get cooled in the fridge and decorate it with your favourite icing and serve.

TIPS:
1. Whenver you beat the batter, beat it in one direction only.
2. You can also use coarse sand instead of salt for baking the cake but using salt is a more easy option.
3. you can make any kind of cake in the cooker by this method. just prepare the batter of different flavours and enjoy the homemade cake any time.

Friday, May 6, 2011

Mix fruit Jelly Icecream jubilee

Introduction:
This is the very simple and creative dish and mouth watering dessert. The trick lies in the presentation of the dessert . As i'm a big icecream lover, I got the idea of it by looking at a nice icecream picture. I tried to create the same picture in reality and it was a big hit. First time I served this for my best friend and he was amused by it.The ingredients listed here varies on your taste. You can add or remove any item as your choice. I'm telling you the ingredients, i generally use.

Ingredients:
Mix fruits(Mango, pineapple, apples, grapes,bananas,oranges,strawberries): 1 cup for each glass
Vanilla icecream: 1 pack
Weikfield jelly crystal pack: 1 pack
Different flavour icecreams: as much as you wish
cherries: for decoration
drinking chocolate powder: 1tsp
rose syrup or gulab sharbat: 2 spoon
honey: 1tsp
grated chocolate: 1 tsp
Serving glasses: 4

Serves for: 4 persons
Method:
Clean the glasses properly. The shape of glass adds to the beauty of the dish. Try to take designer glasswares. Boil 500 ml of water for 1 pack of weikfield jelly crystal. take the jelly powder in a bowl. add boiling water to it and place the jelly at room temperature to get set. after 45 min the jelly will be set and you can keep it in fridge.
Now in the glasses, place a layer of vanilla icecream with the help of spoon. thickness of the layer depends on the size of glasses. Now add rose syrup over the layer. now place the layer of mix fruits over it. Now add honey over the layer. now place a layer of fruit jelly over it.
again a layer of vanilla icecream or any othe flavoured icecream. again a layer of jelly and decorate it with adding cherries, grated chocolate. sprinkle drinking chocolate powder over it. keep in fridgeto cool. Serve chill.

TIPS:
1.The important point is that the icecream flavour you are choosing should be different from the fruits. Like if you are using mangoes then don't use mango icecream and like you don't have strawberries then use strawberry icecream. This will make the serving more versatile.
2. You can make this recipe without jelly too.
3. You can add choco chips and whipped cream for serving.
4.At last it totally depends on your imagination to fill the glasses such that it looks beautiful.